JS学习笔记
对象和变量
语法:var变量名 = 值;
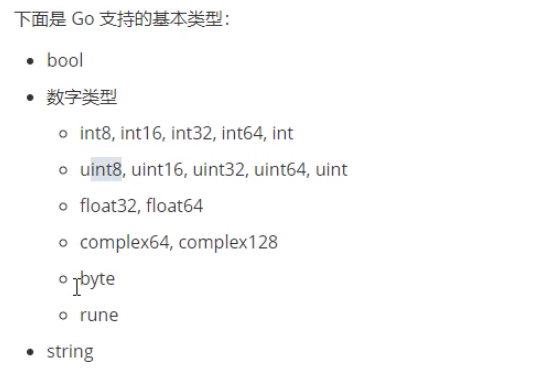
数据类型
基本(值)类型
String, Number, boolean, undefined,null
对象(引用)类型
Object, Function, Array
1 | var obj ={x:1, y:2, z:3}; |
判断(=== 恒等:判断值+类型相同,==:判断值相同)
typeof:可以判断undefined/数值/字符串/boolean,不能判断null和object
1 | var a; |
instanceof: 判断对象的具体类型
1 | var b = { |
重点
- undefined 和null的区别:undefined 代表定义未赋值;null 代表定义并赋值为null
- 什么时候给变量赋值为null:初始赋值,表明将要赋值;结束前,让对象成为垃圾对象,以便被垃圾回收器回收
变量提升
变量提升:当栈内存(作用域)形成,JS代码自上而下执行之前,浏览器首先会把所有带var/function关键字进行提前声明或者定义
var 声明/function 声明+定义
变量提升只发生在当前作用域(开始加载页面的时候只对全局作用域下进行变量提升,函数中存储的都是字符串而已);函数作用域下的变量在函数执行前也会发生变量提升,注意变量提升阶段window中已经存在该属性
带 var 和不带 var 的区别
1、在全局作用域下声明一个变量,相当于给window对象设置了一个属性,变量的值就是属性值
2、在变量提升阶段,全局作用域中声明一个变量a,此时会把a作为属性赋值给window
1 | // 首先运行这两句,会出现错误,因为a没有定义 |
等号左边变量提升
var fn;只对等号左边进行变量提升,所以表达式定义的函数一定是在其生命赋值之后执行的
1 | fn(); // 此时fn是undefined |
es6以后的变化
ES6 中基于let/const方式创建变量或者函数,不存在变量提升机制,同时阻断了全局变量和window属性的映射机制
1 | let n = 10; |
1 | let a = {n : 4} |
内置对象 —- 不懂
Array其实是一个Function类型的对象,它的prototype指向了Function.prototype
new Array()这是一个Object对象,它的prototype是指向了Object.prototype
1 | (function(){ |
This对象
改变this的是Object,Function不会改变this
1 | <script> |
1、js中的this在运行期进行绑定,这是js中this关键字具备多重含义的本质原因
2、js中this可以是全局对象,当前对象或者任意对象,这取决于函数的调用方式
3、自执行函数中的this是Window
Js中函数的调用有以下几种方式:作为对象方法调用,作为函数调用,作为构造函数调用和使用apply和call调用
1、给当前元素的某个事件绑定方法,当事件触发方法执行的时候,方法中的this是当前操作的元素对象
2、普通函数执行,函数中的this取决于执行的主体,方法前面是否有点,有点前面的是谁this就是谁,严格模式下,没有点this是undefined
3、构造函数执行,方法中的this一般都是当前类的实例
4、箭头函数中没有自己的THIS,THIS是上下文的THIS
call
call方法的作用:调用这个函数,修改函数运行时this的指向
[fn].call([this],[param]…) 当前实例(函数fn)通过原型链的查找机制,找到Function.prototype上的call方法
console.dir(Function);
1 |
|
- bind:bind()方法会创建一个新的函数,在bind()被调用时,这个新函数的this被指定为bind的第一个参数,而其余参数将被作为新函数的参数,供调用时使用
注意有两个特征
1、多次bind,仅第一次的bind传入的绑定的this生效
2、使用new操作bind返回的构造函数,曾经绑定的this会失效
1 | <button>点我</button> |
apply:和call基本上一模一样,唯一区别在于传参方式.fn.apply(thisArg,[argsArray])
thisArg:在fun函数运行时指定的this值
argsArray:传递的值,必须包含在数组里面
1 | <script> |
重点:
apply:
1、参数一:改变this的指向(this指向参数一)
2、类数组形式传参:[name,age]
3、立即调用函数
call
1、参数一:改变this的指向(this指向参数一)
2、之后的参数:表示传参 需要枚举出来
3、立即调用函数
bind
1、参数一:改变this的指向(this指向参数一)
2、之后的参数:表示传参 需要枚举出来
3、z需要手动调用
1 | function Person(name, age){ |
1 | // 简单应用< |
对象的创建的几种模式
Object构造函数模式
1
2
3
4
5
6
7
8
9
10var p = new Object();
p.name = 'Tom';
p.age = 12;
console.log(p) // {name: "Tom", age: 12}
p.setName = function(name){
this.name = name;
}
console.log(p) // {name: "Tom", age: 12, setName: ƒ} p.setName('zhangsan');
console.log(p); // {name: "zhangsan", age: 12, setName: ƒ}
console.log(p.setName) // ƒ (name){ this.name = name; }对象字面量模式
1
2
3
4
5
6
7
8var p = {
name: 'tom',
age: 12,
setname: function(name) {
this.name = name;
}
}
console.log(p) // {name: "tom", age: 12, setname: ƒ}工厂模式:通过工厂函数动态创建对象并返回
1
2
3
4
5
6
7
8
9
10
11
12
13
14function createPerson(name,age){
var obj = {
name: name,
age: age,
setName:function(name){
this.name = name;
}
}
return obj;
}
var p1 = createPerson('zhangsan', 23)
var p2 = createPerson('lisi', 28)
console.log(p1) // {name: "zhangsan", age: 23, setName: ƒ}
console.log(p2) // {name: "lisi", age: 28, setName: ƒ}构造函数+原型
1
2
3
4
5
6
7
8
9
10
11
12
13
14
15
16function Person(name, age){
this.name = name;
this.age = age;
}
var p1 = new Person('Tom', 23);
var p2 = new Person('Jack',24);
console.log(p1); // Person {name: "Tom", age: 23}
console.log(p2); // Person {name: "Jack", age: 24}
// 类的显式原型 == 对象的隐士原型
Person.prototype.setName = function(name){
this.name = name;
}
var p1 = new Person('Tom', 23);
var p2 = new Person('Jack',24);
console.log(p1); // Person {name: "Tom", age: 23}
console.log(p2); // Person {name: "Jack", age: 24}
深拷贝与浅拷贝
浅拷贝
大家用的同一块地址,没有开辟新的地址,改动原值就会改变
1 | var a = { |
深拷贝
开辟了新的地址,改动原值也不会改变
1 | var a = { |
关于引用变量赋值问题
1、n个引用变量指向同一个对象,通过一个变量修改对象内部数据,其他所有变量看到的都是修改后的数据
2、2个引用变量指向同一个对象,让其中一个引用变量指向另一个对象,另一个引用变量依然指向前一个对象
函数
所有的函数都是Function的实例
定义函数的三种方式
1、函数声明:
1 | function fn1(){ // 函数申明 console.log("fn1");} |
2、表达式
1 | var fn2 = function(){ console.log('fn2')} |
3、
1 | var fn = new Function('参数1','参数2',...,'函数体') |
箭头函数和普通函数的区别:
1、箭头函数没有arguments,但是可以基于…arg获取实参集合
2、没有自己的this,箭头函数中的this是上下文的this
函数的三种角色
1、普通函数:堆栈内存释放,作用域链
2、类
3、普通对象,和普通的OBJ没有区别,主要是对键值对进行增删改查
1 | function Fn(){ |
回调函数
常见的回调函数:
dom事件的回调函数
1
2
3document.getElementById('btn').onclick = function(){
alert(this, innnerHTML);
}定时器回调函数
ajax回调函数
声明周期回调函数
IIFE
Immediately-Invoked Function Expression 立即执行函数表达式
1 | // 立即执行函数 |
作用1:不会污染全局命名空间
1
2
3
4
5
6(function(){
var a = 10;
console.log(a + 3); // 13
})()
var a = 20;
console.log(a); // 20作用2:隐藏实现
1
2
3
4
5
6
7
8
9
10
11
12(function(){
var a = 1;
function f1(){
console.log(++a);
} // 2
function f2(){}
window.$ = function(){
// 向外暴露一个全局函数
return{
func:f1
}
}})()$().func(); // $是一个函数,执行后返回的是一个对象
原型(重点、难点)
原型是一个对象,原型的作用是存储一个公共的属性和方法供它的实例调取使用
预备知识
[函数]
普通函数,类
[对象]
普通对象,数组,正则,arguments…,prototype的值也是对象类型的,函数也是对象类型的
1、所有的函数数据类型都带有prototype属性,这个属性是一个对象,浏览器会默认给它开辟一个堆内存
prototype的作用就是存储一些公共的属性和方法,供他的实例调取使用
2、默认的prototype带有constructor属性,这个属性存储的值是函数本身 (Date.prototype.constructor === Date)
3、每一个对象都有一个__proto__的属性,这个属性指向当前实例所属类的prototype原型对象其实就是普通对象,但Function.prototype是一个匿名函数也是一个空函数,执行没有任何输出*所有的函数都是Function的实例**
原型链:他是一个基于proto\向上查找的机制,这个属性指向当前实例所属类的prototype
1、找到查找结果,使用自己私有的即可
2、找不到,则基于__proto__找所属类的prototype,如果找到了就使用;如果没有找到就沿着原型上的__proto__继续向上查找,一直找到Object.prototype的原型为止;如果仍然没有找到,操作的属性或方法不存在
原型链
JavaScript的成员查找机制
先在自身属性中查找,找到返回
如果没有,在沿着__proto__这条链上查找,找到返回
如果最终没有找到,返回undefined
原型链的属性问题:
1、读取对象的属性值时:会自动到原型链中查找
2、设置对象的属性时,不会查到原型链,如果当前对象中没有此属性,直接添加此属性并设置其值
3、方法一般定义子原型中,属性一般通过构造函数定义在对象本身中
instanceof的判断原理
表达式:A instanceof B
如果B的显式原型对象在A对象的原型链上,返回true,否则返回false
闭包 — 不懂
一种理解:闭包指有权访问另一个函数作用域中变量;简单理解:一个作用域可以访问另一个函数内部的局部变量,局部变量所在的函数产生闭包
闭包的作用:延伸了变量的作用范围
简单的说:函数形成一个私有的作用域,保护里面的私有变量不受外界的干扰,这种保护机制成为闭包
1 | function fn(){ |
1 | <ul> |
闭包的作用
1、使用函数内部的变量在函数执行完后,仍然存活在内存中(延长了局部变量的生命周期)
2、让函数外部可以操作(读写)函数内部的数据(变量/函数)
循环遍历加监听
1 |
|
内存溢出与内存泄漏
内存溢出:当程
序需要的内存超过了剩余的内存时,就抛出了内存溢出的错误
内存泄漏:占用的内存内有及时释放
常见的内存泄漏:没有及时清理的计时器或回调函数,闭包
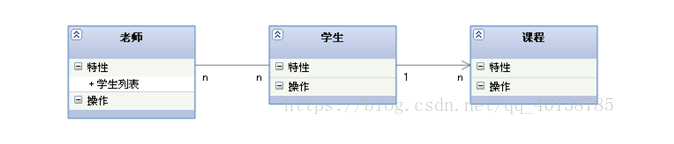
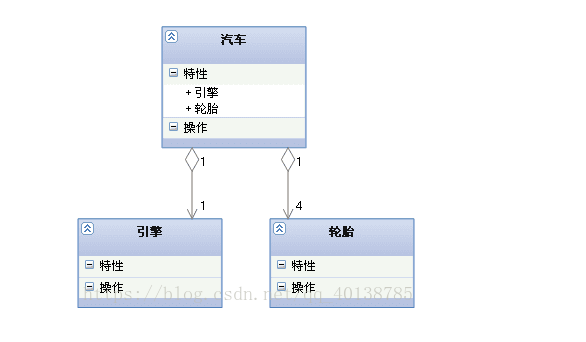
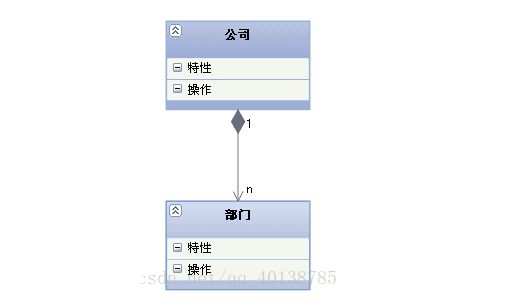
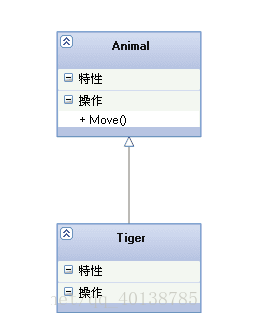
面向对象
>多态:父类定义一个方法不去实现,让继承它的子类去实现,每一个子类都有不同的表现
单例模式
高级单例模式形成私有作用域a,在a中创建一个堆内存,把对内存地址赋值给命名空间
1 | var namespace = (function(){ |
基于构造函数创建自定义类:new xxx(),这样普通函数就变成了构造函数,接收的返回结果是当前类的一个实例
创建对象的方式
字面量表达式
1 | var obj = {}; |
构造函数模式
1 | var obj = new Object(); |
基于数据类型基于两种模式创建出来的值是不一样的,基于字面量方式创建出来的值是基本类型值;基于构造函数创建出来的值是引用类型
通过构造函数创建对象
1 | <script> |
构造函数是一种特殊的函数,主要用来初始化对象,即为对象成员变量赋初始值,它总是与new一起使用,通常把对象中公共的属性和放大抽取出来,然后封装到这个函数里面
构造函数的实例成员和静态成员
JavaScript中的构造函数中可以添加一些成员,可以在构造函数本身上添加(静态成员),也可以在构造函数内部的this上添加(实例成员)
静态成员:在构造函数本身上添加的成员称为静态成员,只能由构造函数本身访问
实例成员:在构造函数内部创建的对象成员称为实例成员,只能由实例化的对象来访问
1 | <script> |
构造函数通过原型分配的函数所有对象是共享的,JavaScript规定,在每一个构造函数都有一个prototype属性,可以把方法定义在prototype对象上,这样所有对象实例就可以共享这些方法
对象原型__proto__:对象都会有一个属性__proto__指向构造函数的prototype,之所以我们对象可以使用构造函数prototype原型对象的属性和方法,就是因为对象有__proto__原型的存在
1 | <script> |
constructor: __proto__和prototype里面都有一个constructor属性,它指构造函数本身
继承
JS的继承并不是把父类的属性方法克隆一份给子类,而是让子类和父类建立原型链接的机制,子类的实例调取父类原型上的方法是基于原型链的查找机制完成的
通过构造函数+原型对象模拟实现继承
构造函数继承父类类型的属性;原型对象继承父类型的方法
属性的继承
1 | <script> |
方法的继承
1 | <script> |
es6中的面向对象
1 | class User{ |
1 |
|
继承
super关键字用于访问和调用对象父类上的函数,可以调用父类的构造函数,也可以调用父类的普通函数
继承中的属性或者方法查找原则:就近原则
1、继承中,如果实例化子类输出一个方法,先看子类有没有这个方法,如果有先执行子类的方法
2、继承中,如果子类里面没有,就去查找父类有没有这个方法,如果有就执行这个方法
注意:
1、super必须放在子类this之前
2、在es6中类没有变量提升,所以必须先定义类再实例化对象
3、类里面的公有属性和方法一定要加this使用
4、constructor里面的this指向实例对象,方法里面的this指向这个方法的调用者
5、子类会将父类的静态方法继承下来
1 | class Parent{ |
1 | <script> |
super作为对象:普通方法中表示父类的原型对象;在静态方法中表示父类
1 | class Parent{ |
1 | <script> |
子类的__proto__指向父类本身,即Child.__proto__ === Parent
子类的prototype属性的__proto__指向父类的prototype属性 // Child.prototype.__proto__ === Parent.prototype
实例的__proto__属性的__proto__指向父类实例的__proto__
es5中原生构造函数无法继承,es6中可以继承,包括:Boolean,Number,String,Array,Date,Function,RegExp,Error,Object
json(对象)解析
访问对象的内部数据的两种方式
属性名:编码简单,有时不能用
属性名包含特殊字符p[‘content-type’] = ‘text/json’;
变量名不确定
1 | var p = {}; |
[‘属性名’]:通用
JSON转字符串:JSON:stringify(data)
字符串转JSON:JSON.parse(str)
定义
1 | var json = {'name':'zhang'};json['name'] = 'yang';console.log(json.name) // yang |
遍历
1 | var json = { id: 1, name: 'zhang', |
原因:json是以“{}”的方式来开始和结束的,在js中,它会被当作一个语句块来处理,所以必须强制性的把它转成表达式。加上圆括号的目的是迫使eval函数在处理javascript代码的时候强制将括号内的表达式转成对象,而不是作为语句来执行。
数组
push : 在数组的末尾添加元素,返回值为数组的长度
unshift:在数组的头部添加元素,返回值为数组的长度
pop:弹出尾部的元素
shift:弹出头部的元素
splice:
删除arr.splice(0,2) ,从数组的第一个元素开始,删除2个数据
替换arr.splice(0, 1, ‘haha’),将数组的第一个元素替换为‘haha’
字符串转数组:arr.split(‘’)
字符串反转:
var str = ‘zhangchuang’;
var arr = str.split(‘’).reverse().join(‘’);
随机数:
Math.random() : 返回0-1之间的小数
Math.round() : 四舍五入
返回x-y之间的整数:Math.round(Math.random() * (y - x)) + x
1 | var jsonArray = "[{name:'zhang', age:22}, {name:'heng', age:32}]";var jsonObj = eval("(" + jsonArray + ")");for(var i = 0; i < jsonObj.length; i++){ alert(jsonObj[i].name);} |
正则表达式
正则匹配:验证字符串是否符合某个规则
正则捕获:把一个字符串中符合规则的字符提取出来
创建正则的两种方式
字面量的方式:/pattern/flag
RegExp对象创建:new RegExp(‘a’, ‘i’) // 忽略大小写
正则中的元字符(特殊字符):( [ { \ ^ $ | ) ? * + . ] }
注意斜杠 / 需要转义
修饰符(flag):
i:执行对大小写不敏感的匹配
g:执行全局匹配,查找所有匹配而非在找到第一个匹配后停止
s:(ES9)dotAll模式,.可以匹配换行符
类
类使用 [] 来表达,用于查找某个范围内的字符
预定义类
| 预定义类 | 等价 | 描述 |
|---|---|---|
| \s | [\t\n\x0B\f\r] | 空格 |
| \S | [^\t\n\x0B\f\r] | 非空格 |
| \d | [0-9] | 数字 |
| \D | [^0-9] | 非数字 |
| \w | [a-zA-Z_0-9] | 单词字符(字符、数字、下划线) |
| \W | [^a-zA-Z_0-9] | 非单词字符 |
| . | [^\r\n] | 任意字符,除了回车与换行符外所有字符 |
| \f | \x0c \cL | 匹配一个换页符 |
| \n | \x0a \cJ | 匹配一个换行符 |
| \r | \x0d \cM | 匹配一个回车符 |
| \t | \x09 \cI | 匹配一个制表符 |
| \v | \x0b \cK | 匹配一个垂直制表符 |
| \xxx | 查找以八进制数 xxx 规定的字符 | |
| \xdd | 查找以十六进制数 dd 规定的字符 | |
| \uxxxx | 查找以十六进制数 xxxx 规定的Unicode字符 |
注意事项
中括号出现的元字符一般代表本身的含义
1 | let reg = /^[.]+$/;console.log(reg.test('n')); // false |
量词
量词表示匹配多少个目标对象,精确匹配长度使用 {}
| 量词 | 等价 | 描述 |
|---|---|---|
| n * | {0,} | 匹配零个或多个n |
| n + | {1,} | 匹配至少一个n的字符串 |
| n ? | {0,1} | 匹配零个或一个n |
| {n} | 匹配n次 | |
| {n,m} | 匹配n到m次 | |
| {n,} | 至少匹配n次 |
边界
| 边界 | 描述 |
|---|---|
| ^ | 以xx开始,在类[]中表示非 |
| $ | 以xx结束 |
| \b | 单词边界 |
| \B | 非单词边界 |
1、^匹配字符串开始位置,也就是位置0,如果设置了RegExp对象的Multiline属性m,^也匹配’\n’或’\r’之后的位置
2、$一般匹配字符串结束位置,如果设置了RegExp对象的Multiline属性m,$也匹配’\n’或’\r’之前的位置
3、\b匹配一个单词边界,也就是指定单词和空格间的位置,如er\b可以匹配”never”中的‘er’。但不能匹配“verb”中的’er‘
\B匹配非单词边界,如er\B能匹配“verb”中的‘er’,但不能匹配“never”中的’er‘
分组
分组使用()
分组中使用 | 可以达到或的效果
改变默认优先级
1 | let reg = /^18|19$/; |
分组引用(后向引用)
\n 表示后向引用, \1 是指在正则表达式中,从左往右第1个()中的内容;以此类推,\2 表示第2个(),\0表示整个表达式
1 | let reg = /^([a-z])([a-z])\2\1$/; // \1表示和第一个分组中一模一样的内容console.log(reg.test('oppo')); // true//匹配日期格式,表达式中的\1代表重复(-|\/|.)var rgx = /\d{4}(-|\/|.)\d{1,2}\1\d{1,2}/ |
反向引用
使用()后可以使用 $1-$9等来匹配
1 | let str = '2018-02-11';let ret = str.replace(/(\d{4})\-(\d{2})\-(\d{2})/g, '$2/$3/$1'); |
后向引用和反向引用的区别是:\n只能用在表达式中,而 $n只能用在表达式之外的地方。
分组捕获
被正则表达式匹配(捕获)到的字符串会被暂存起来. 其中由分组捕获的串会从1开始编号
1 | let reg = /(\d{4})-(\d{2})-(\d{2})/;let date = '2010-04-12';reg.test(date);console.log(RegExp.$1); // 2010console.log(RegExp.$2); // 04 |
分组捕获的命名(ES9)
1 | const pattern = /(\d{4})-(\d{2})-(\d{2})/u;const result = pattern.exec('2018-10-25');console.log(result[0]); //2018-10-25console.log(result[1]); // 2018 |
正则捕获的懒惰性
exec - > 正则的捕获
每一次捕获的时候都是先进行默认的匹配,如果没有匹配成功的,捕获的结果是null;只有有匹配的内容我们才能捕获到;
捕获的内容格式
1、捕获到的内容是一个数组,数组中的第一项是当前正则捕获的内容
index:捕获内容在字符串中开始的索引位置
input:捕获的原始字符串
1 | var reg = /\d+/;var str = 'woshi2016ni2017'; |
正则捕获的贪婪性
正则表达式在匹配的时候默认会尽可能多的匹配,叫贪婪模式。通过在限定符后加 ?可以进行非贪婪匹配
比如 \d{3,6}默认会匹配6个数字而不是3个,在量词 {}后加一个 ?就可以修改成非贪婪模式,匹配3次
1 | console.log("12345678".replace(/\d{3,6}/, '-'))// -78 |
?在正则中有很多的作用:
放在一个普通的元字符后面代表出现0-1次 /\d?/ ->数字可能出现也可能不出现
放在一个量词的元字符后面是取消捕获时候的贪婪性
表格操作相关
> 动态创建表格
1 | <!DOCTYPE html><html lang="en"><head> <meta charset="UTF-8"> <meta name="viewport" content="width=device-width, initial-scale=1.0"> |
常用方法
参考文档:
form()
The Array.from()
static method creates a new, shallow-copiedArray instance from an array-like or iterable object.
2
>
1 | console.log(Array.from('foo'));// expected output: Array ["f", "o", "o"] |
isArray()
The Array.isArray() method determines whether the passed value is an [Array]
2
>
1 | Array.isArray([1, 2, 3]); // trueArray.isArray({foo: 123}); // false |
of()
The Array.of() method creates a new
Arrayinstance from a variable number of arguments, regardless of number or type of the arguments.The difference betweenArray.of()and the Arrayconstructor is in the handling of integer arguments: Array.of(7)creates an array with a single element,
7, whereas Array(7)creates an empty array with alengthproperty of7(Note: this implies an array of7empty slots, not slots with actualundefinedvalues).
2
>
1 | Array.of(7); // [7] Array.of(1, 2, 3); // [1, 2, 3]Array(7); // array of 7 empty slotsArray(1, 2, 3); // [1, 2, 3] |
concat()
The concat()method is used to merge two or more arrays. This method does not change the existing arrays, but instead returns a new array.
2
>
1 | const array1 = ['a', 'b', 'c'];const array2 = ['d', 'e', 'f'];const array3 = array1.concat(array2);console.log(array3);// expected output: Array ["a", "b", "c", "d", "e", "f"] |
copyWithin()
The copyWithin() method shallow copies part of an array to another location in the same array and returns it without modifying its length.
2
>
1 | const array1 = ['a', 'b', 'c', 'd', 'e'];// copy to index 0 the element at index 3 |
entries()
The entries()
method returns a newArray Iterator` object that contains the key/value pairs for each index in the array.
2
>
1 | const a = ['a', 'b', 'c'];for (const [index, element] of a.entries()) console.log(index, element);// 0 'a' // 1 'b' // 2 'c' |
every()
The every() method tests whether all elements in the array pass the test implemented by the provided function. It returns a Boolean value.
2
>
1 | function isBigEnough(element, index, array) { |
fill()
The fill()method changes all elements in an array to a static value, from a start index (default
0) to an end index (defaultarray.length). It returns the modified array.
2
>
1 | const array1 = [1, 2, 3, 4];// fill with 0 from position 2 until position 4 |
#### 8.9 filter()
The
filter()method creates a new array with all elements that pass the test implemented by the provided function.
2
>
1 | const words = ['spray', 'limit', 'elite', 'exuberant', 'destruction', 'present'];const result = words.filter(word => word.length > 6);console.log(result); // (3) ["exuberant", "destruction", "present"] |

1 | function isBigEnough(value) { return value >= 10}let filtered = [12, 5, 8, 130, 44].filter(isBigEnough)// filtered is [12, 130, 44]const array = [-3, -2, -1, 0, 1, 2, 3, 4, 5, 6, 7, 8, 9, 10, 11, 12, 13]; |
find()
The find()method returns the value of the first element in the provided array that satisfies the provided testing function.
2
>
1 | const array1 = [5, 12, 8, 130, 44]; |
findIndex()
The findIndex()method returns the index of the first element in the array that satisfies the provided testing function. Otherwise, it returns
-1, indicating that no element passed the test.
2
>
1 | const array1 = [5, 12, 8, 130, 44]; |
flat()
The flat() method creates a new array with all sub-array elements concatenated into it recursively up to the specified depth.
2
>
1 | const arr1 = [0, 1, 2, [3, 4]]; |
flatMap()
The flatMap()method first maps each element using a mapping function, then flattens the result into a new array. It is identical to a
map()followed by aflat()of depth 1, butflatMap()is often quite useful, as merging both into one method is slightly more efficient.
2
>
1 | let arr1 = [1, 2, 3, 4];arr1.map(x => [x * 2]); // [[2], [4], [6], [8]] |
1 | let arr1 = ["it's Sunny in", "", "California"]; |
forEach()
The forEach()method executes a provided function once for each array element.
2
>
1 | const array1 = ['a', 'b', 'c'];array1.forEach(element => console.log(element)); |
includes()
The includes()method determines whether an array includes a certain value among its entries, returning
trueorfalseas appropriate.
2
>
1 | const array1 = [1, 2, 3]; |
indexOf()
The indexOf()method returns the first index at which a given element can be found in the array, or -1 if it is not present.
2
>
1 | const beasts = ['ant', 'bison', 'camel', 'duck', 'bison']; |
jion()
The join() method creates and returns a new string by concatenating all of the elements in an array (or an array-like object), separated by commas or a specified separator string. If the array has only one item, then that item will be returned without using the separator.
2
>
1 | const elements = ['Fire', 'Air', 'Water']; |
keys()
The keys() method returns a new Array Iterator object that contains the keys for each index in the array.
2
>
1 | const array1 = ['a', 'b', 'c']; |
lastIndexOf()
The lastIndexOf() method returns the last index at which a given element can be found in the array, or -1 if it is not present. The array is searched backwards, starting at
fromIndex.
2
>
1 | const animals = ['Dodo', 'Tiger', 'Penguin', 'Dodo']; |
map()
The map() method creates a new array populated with the results of calling a provided function on every element in the calling array.
2
>
1 | const array1 = [1, 4, 9, 16];// pass a function to mapconst map1 = array1.map(x => x * 2); |
pop()
The pop() method removes the last element from an array and returns that element. This method changes the length of the array.
2
>
1 | const plants = ['broccoli', 'cauliflower', 'cabbage', 'kale', 'tomato']; |
push()
The push() method adds one or more elements to the end of an array and returns the new length of the array.
2
>
1 | const animals = ['pigs', 'goats', 'sheep'];const count = animals.push('cows');console.log(count);// expected output: 4 |
reduce()
The reduce() method executes a reducer function (that you provide) on each element of the array, resulting in single output value.
2
>
1 | const array1 = [1, 2, 3, 4]; |
reduceRight()
The reduceRight() method applies a function against an accumulator and each value of the array (from right-to-left) to reduce it to a single value.
2
>
1 | const array1 = [[0, 1], [2, 3], [4, 5]].reduceRight( (accumulator, currentValue) => accumulator.concat(currentValue)); |
reverse()
The reverse() method reverses an array in place. The first array element becomes the last, and the last array element becomes the first.
2
>
1 | const array1 = ['one', 'two', 'three']; |
shift()
The shift() method removes the first element from an array and returns that removed element. This method changes the length of the array.
2
>
1 | const array1 = [1, 2, 3];const firstElement = array1.shift();console.log(array1);// expected output: Array [2, 3] |
slice()
The slice() method returns a shallow copy of a portion of an array into a new array object selected from
starttoend(endnot included) wherestartandendrepresent the index of items in that array. The original array will not be modified.
2
>
1 | const animals = ['ant', 'bison', 'camel', 'duck', 'elephant']; |
some()
The some() method tests whether at least one element in the array passes the test implemented by the provided function. It returns a Boolean value.
2
>
1 | const array = [1, 2, 3, 4, 5];// checks whether an element is even |
sort()
The sort() method sorts the elements of an array in place and returns the sorted array. The default sort order is ascending, built upon converting the elements into strings, then comparing their sequences of UTF-16 code units values.
The time and space complexity of the sort cannot be guaranteed as it depends on the implementation.
2
>
1 | const months = ['March', 'Jan', 'Feb', 'Dec']; |
splice()
The splice() method changes the contents of an array by removing or replacing existing elements and/or adding new elements in place.
2
>
1 | const months = ['Jan', 'March', 'April', 'June']; |
toLocaleString()
The toLocaleString() method returns a string representing the elements of the array. The elements are converted to Strings using their
toLocaleStringmethods and these Strings are separated by a locale-specific String (such as a comma “,”).
2
>
1 | const array1 = [1, 'a', new Date('21 Dec 1997 14:12:00 UTC')];const localeString = array1.toLocaleString('en', { timeZone: 'UTC' }); |
toSource() ???
The toSource() method returns a string representing the source code of the array.
2
>
1 |
toString()
ThetoString()method returns a string representing the specified array and its elements.
2
>
1 | const array1 = [1, 2, 'a', '1a']; |
unshift()
The unshift() method adds one or more elements to the beginning of an array and returns the new length of the array.
2
>
1 | const array1 = [1, 2, 3]; |
values()
The
values()method returns a newArray Iteratorobject that contains the values for each index in the array.
2
>
1 | const array1 = ['a', 'b', 'c']; |
@@iterator
The @@iterator method is part of The iterable protocol, that defines how to synchronously iterate over a sequence of values.
The initial value of the @@iterator property is the same function object as the initial value of the
values()property.
2
>
WebApi
参考API: https://developer.mozilla.org/zh-CN/docs/WEB/API
Dom对象
定义
1、DOM是Document Object Model文档对象模型的缩写。根据W3C DOM规范,DOM是一种与浏览器,平台,语言无关的接口,使得你可以访问页面其他的标准组件
2、D:文档 – html 文档 或 xml 文档
3、O:对象 – 把document里的所有节点都看成对象
4、M:模型(用于建立从文档到对象的模型)
5、DOM 是针对xml(html)的基于树的API。
6、DOM树:节点(node)的层次。
7、DOM 把一个文档表示一个树模型
8、DOM定义了Node的接口以及许多种节点类型来表示XML节点的多个方面
DOM的映射机制
页面中的HTML元素, 和JS通过相关方法获取到的元素集合或者元素对象存在映射关系(一个改变另外一个跟着自动修改)
xxx.style.color = ‘red’; 把xxx元素对象对应堆内存中的style属性下的color属性值改为red, 由于DOM映射关系, 页面中的标签和xxx元素对象绑定在一起, 修改元素对象空间的值, 页面中的元素会按照最新的值进行渲染.
queryElementsBytagName获取到的空元素集合, 元素数据绑定后, 不需要重新获取; 而querySelectorAll不存在DOM映射机制, 数据绑定之后要重新获取.
BOM
browser object model: 浏览器对象模型
弹出新的浏览器窗口
移动、关闭浏览器窗口以及调整窗口大小
提供用户屏幕分辨率详细信息的屏幕对象
页面加载完毕触发的事件:window.onload
定时器: window.setInterval, window.setTimeout;
清理定时器: clearInterval, clearTimeout
1 |
|
渐变效果
1 |
|
document
document.body //获取body
document.title //获取title
document.documentElement //获取html
xnavigator
对象主要包含了有关客户端浏览器的信息
cookieEnabled:cookie的支持情况
userAgent:获取浏览器版本与版本号
platform: 判断浏览器所在的系统平台的类型
###### 10.1.1.5 Screen
1 | <!-- 滚动条自动滚动 --> |
History
History对象包含客户端在浏览器中访问的URL
1 | length,back(),forward(),go() |
Location
包含有关当前URL的信息
hash: 设置或返回URL锚点
href: 设置或返回URL,可以设置跳转
hostname: 设置或返回当前的主机名
pathname: 设置或返回URL路径部分
protocol: 设置或返回当前传输协议
search: 设置或返回从?开始的URL查询部分
assign(): 加载新的文档
reload(): 重新加载
replace(): 新文档替换当前文档
获取元素
getElementById()
1、 查询给定ID属性值的元素,返回该元素的元素节点。也称为元素对象。
2、 因为在一个html页面中id的值是唯一的,所以返回值也是唯一的。所以方法的名称为getElementById()而不是getElementsById()
3、 该方法只能用于document对象,只有document这个实例的原型上才能找到这个方法
4、 如果获取不到,返回null
getElementsByName()
1、查找给定name属性的所有元素,这个方法将返回一个节点集合,也可以称为对象集合。
2、这个集合可以作为数组来对待,length属性的值表示集合的个数。
3、因为在html页面中,name不能唯一确定一个元素,所以方法的名称为getElementsByName而不是getElementByName
4、不推荐使用,有兼容性问题
getElementsByTagName()
1、查询给定标签名的所有元素 2、因为在html页面中,标签名不是唯一的,所以返回值为节点的集合。 3、这个集合可以当做数组来处理,length属性为集合里所有元素的个数 4、可以有两种形式来执行这个方法: 1、var elements =document.getElementsByTagName(tagName); 2、var elements = element.getElementsByTagName(tagName); 5、从这两种方法可以看出持有这个方法的对象并不一定是整个文档对象 (document).也可以是某一个元素节点。 6、如果获取不到,返回一个空集合
getElementsByClassName()
根据class属性名获取元素,ie9以后支持.
querySelector()
https://developer.mozilla.org/en-US/docs/Web/API/Document/querySelector
返回文档中与指定选择器或选择器组匹配的第一个 html元素
querySelectAll()
https://developer.mozilla.org/zh-CN/docs/Web/API/Document/querySelectorAll
返回与指定的选择器组匹配的文档中的元素列表
document.documentElement
document.body
document.head.
addEventListener()
为元素绑定(同时多个)事件: 对象.addEventListener() 谷歌和火狐支持,IE8不支持
第三个参数控制事件是捕获事件(true,从外向里传递)还是冒泡事件(false,从里向外传递)
1 | <button>Pick Me!</button> |
removeEventListener()
为元素解除绑定的事件
事件、节点、属性
事件
事件名称: click
事件源: 谁触发的事件
鼠标事件
click: 点击(PC端是点击, 移动端代表单击(300ms延迟))
dbclick: 双击
mouseover: 鼠标经过
mouseout: 鼠标移出
mouseenter: 鼠标进入
mouseleave: 鼠标离开
mousemove: 鼠标移动
mousedown: 鼠标按下(鼠标左右键都起作用)
mouseup: 鼠标抬起
mousewheel: 鼠标滚轮移动
mouseenter和mouseover的区别:
1. over属于滑过事件, 从父元素进入到子元素, 属于离开了父元素, 会触发父元素的out子元素over; enter属于进入, 从父元素进入子元素, 并不算离开父元素, 不会触发父元素的leave, 而会触发子元素的enter
2. mouseenter和mouseleave阻止了事件的冒泡传播, 而mouseover和mouseout存在冒泡传播
3. 因此鼠标的进入和离开多使用mouseenter和mouseleave
键盘事件
keydown: 键盘按下
keyup: 键盘抬起
input: 移动端使用input统一代替
表单元素常用的事件
focus:获取焦点
blur:失去焦点
change:内容改变
其它常用的事件
load:加载完成
unload
beforeunload
scroll:滚动条滚动事件
resize:大小改变事件 window.onresize=function(){} 当浏览器窗口大小发生改变,会触发这个事件,执行对应的事情
事件的绑定
[DOM0级事件绑定] //事件的冒泡阶段执行
onclick是事件的一个私有属性, DOM0绑定的原理就是给元素某一个事件私有属性赋值.
[element].onxxx = function(){ }
[DOM2级事件绑定] //如果第三个参数设置为true, 会在事件的捕获阶段执行; 设置为false则会在事件的冒泡阶段执行.
DOM2事件绑定可以给当前元素的某一个事件行为绑定多个不同的方法
document.getElementById(‘box’).addEventListener(“click”,function(e){
console.log(e);
});
DOM0和DOM2的区别
机制不一样
DOM0采用的是给私有属性赋值, 所以只能绑定一个方法
DOM2采用的是事件池机制, 所以能绑定多个不同的方法
2.移除
box.onclick = null;
DOM2在移除的时候, 必须清楚要移除哪一个方法
DOM2事件增加了DOMContentLoaded事件(当页面中的HTML结构加载完成就会执行)
box.addEventListener(‘DOMContentLoaded’, fn)
window.onload是当页面中的资源都加载完成(html结构,css和js资源加载完成才会触发执行)
定义一个形参EV接收方法执行的时候,浏览器传递的信息值称为事件对象, MouseEvent鼠标事件对象、KeyboardEvent键盘事件对象 等
- MouseEvent
ev.target:事件源(操作的是哪个元素)
ev.clientX / ev.clientY :当前鼠标触发点距离当前窗口左上角的X/Y轴坐标
ev.pageX / ev.pageY:当前鼠标触发点距离BODY(第一屏幕)左上角的X/Y轴坐标
ev.preventDefault():阻止默认行为
ev.stopPropagation():阻止事件的冒泡传播
ev.type:当前事件类型
- KeyboardEvent
ev.code:当前按键’keyE’
ev.key:当前按键’e’
ev.which / ev.keyCode:当前按键的键盘码 69
let code = ev.which || ev.keyCode;
事件的传播机制
捕获阶段: 点击inner的时候, 首先从最外层开始向内查找(找到操作的数据源), 查找的目的是构建冒泡传播时传播的路线. 可以从ev.path看到这个层次结构
冒泡传播: 按照捕获阶段的路线, 自内向外把当前事件源的祖先元素的相关元素事件依次触发
事件的冒泡
多个元素嵌套,有层次关系,这些元素注册了相同的事件,如果里面的元素的事件触发了,外面元素该事件自动触发了
1 |
|
阻止事件的冒泡
1 | document.getElementById("box").onmousedown = function(e){ e = e || window.event; e.stopPropagation ? (e.stopPropagation()) : (e.cancelBubble = true);} |
为同一个元素注册多个不同的事件
1 |
|
鼠标的跟随
当鼠标经过目标区域时,根据鼠标的位置,目标区域的位置,和一个固定的偏移量,即可算出跟随的区域的位置
1 | lis[i].onmousemove = function(ev){ |
事件的委托机制
事件委托就是利用事件冒泡,只指定一个事件处理程序,就可以管理某一类型的所有事件.
属性的操作
dom的属性一般对应元素的属性
非表单元素的属性
href, title, id, src, className等
案例:控制div的显示与隐藏和按钮文字的切换
1 |
|
innerHTML 和 innerText
innerHTML和innerText获取或设置开始标签与结束标签之间的内容
innerHTML: 获取内容的时候,如果内容中有标签,会把标签页获取到;设置内容时,如果内容中带标签,会以HTML的方式解析
innerText/textContent: 获取标签的内容,如果内容中有标签,会把标签过滤掉; 设置内容时,如果内容中带标签,会以字符串形式显示出来
div中插入一张图片
1 | <div>1111111111111</div> |
判断某个标签是否含有某个属性
1 | typeof element.innerText === 'string' //如果不存在,值为undefined. |
表单元素的属性
value: 用于大部分表单元素的内容获取
type: 可以获取input标签的类型(输入框或复选框等)
disabled: 禁用属性
checked: 复选框选中属性,当标签的属性只有一个值得时候,dom对应的属性的值是bool类型
selected: 下拉菜单选中属性
案例1:
1 |
|
案例2:简易表格
1 |
|
操作属性的值
获取自定义属性: getAttribute
将给定元素添加一个新的属性或改变它现有属性的值: setAttribute
删除属性: removeAttribute
排他性的一种写法:
1 | span[i].onclick = function(){for(var j = 0; j < spans.length; j++){ span[j].removeAttribute("class");}this.className = "current";} |
案例:js动画
1 | <html lang="en"> |
节点
1、从结构图可以看出,整个html称为dom树。而dom的引用为document,也称为一个节点
2、每一个HTML标签都为一个元素节点
3、dom中元素、文本、属性都是节点
nodeName
1、文档中的每一个节点都有这个属性
2、为给定节点的名称
3、如果节点是元素节点,nodeName返回元素的名称
如果给定节点为属性节点,nodeName返回属性的名称
如果给定节点为文本节点,nodeName返回为#text的字符串
nodeType
1、该节点表明节点类型,返回值为一个整数
2、常用的节点类型有三种:
1、元素节点类型 值为1
2、属性节点类型 值为2
3、文本节点类型 值为3
nodeValue
1、返回给定节点的当前值(字符串)
2、如果给定节点是属性节点,返回值是这个属性的值
如果给定节点是文本节点,返回值是这个文本节点的内容
如果给定节点是元素节点,返回值是null
3、nodeValue是一个读写属性
parentNode 和 parentElement
1、parentNode返回给定元素节点的父节点
2、document没有父节点
3、parentElement返回给定元素节点的父元素
childNodes, children, 属性
childNodes: 获取节点:元素1(通常是html标签),文本3(包括空文本),注释8
children: 只能获取元素节点
hasChildNode()
1、该方法用来判断一个元素是否有子节点
2、返回值为true或者false
3、文本节点和属性节点不可能再包含子节点,所以对于这两类节点使用 ChildNodes()方法 返回值永远为false.
4、如果hasChildNodes()返回值为false,则childNodes,firstChild,lastChild将为空数组或者空字符串。
获取属性
元素. attributes //获取元素身上所有属性构成的集合
得到里面的值 // attributes[i].value
firstChild
1、该属性返回给定节点的第一个子节点
2、var reference = node.firstChild
3、文本节点和属性节点不包括任何子节点,所以返回值为null
4、node.firstChild=node.childNodes[0]
firstElementChild:返回给定节点的第一个子元素(标签) lastChild:该属性返回给定节点的最后一个子节点
lastElementChild:返回给定节点的最后一个子元素(标签)
nextSibling:返回给定节点的下一个兄弟节点
nextElementSibling:返回给定节点的下一个兄弟元素(标签)
previousSibling:返回给定节点的上一个兄弟节点
previousElementSibling:返回给定节点的上一个兄弟元素(标签)
节点的增删改查
createElement
1、按照给定的标签名创建一个新的元素节点,方法的参数为被创建的元素的名称
2、var reference = document.createElement(elementName);
3、方法的返回值指向新建节点的引用,返回值是一个元素节点,所以nodeType 为1
4、新建的节点不会自动添加到文档里,只是存在于document里一个游离的对象
createTextNode()
1、创建一个包含给定文本的新文本节点
2、这个方法的返回值指向这个新建的文本节点的引用
3、该方法有一个参数:新建文本节点的文本内容
4、它是一个文本节点,所以nodeType值为3
5、新建的文本对象不会自动添加到文档里,属于游离态的对象。
removeChild()
1、从给定的元素里删除一个子节点
2、var reference = element.removeChild(node)
3、返回值指向已经被删除的子节点的引用
4、当某个子节点被删除时,这个子节点所包含的子节点也被删除掉
replaceChild()
1、把一个给定父元素里的一个子节点替换为另外一个子节点
2、var reference = element.replaceChild(newChild,oldChild)
3、返回值指向已经被替换掉的那个子节点的引用
appendCild()
1、为给定元素增加一个子节点
var newreference = element.appendChild(newChild);
2、给定子节点newChild将成为element的最后一个节点
3、方法的返回值指向新增节点的引用
4、该方法通常与createElement()与createTextNode()一起使用
5、新节点可以追加给文档中的任何一个元素(不是属性和文本)
insertBefore()
1、把一个给定节点插入到一个给定元素子节点的前面
2、var reference = element.insertBefore(newNode,targetNode)
3、newNode节点将作为element的子节点出现,并在targetNode节点的前面
4、节点targetNode必须是element的一个子节点
5、该方法通常与createElement和createTextNode结合使用
JS盒子模型属性
Js获取盒子模型属性属性值的特点:
获取的都是数字不带单位.
获取的都是整数,不会出现小数(一般都会四舍五入, 尤其获取的偏移量)
获取的结果都是复合符合样式值(几个元素的样式组合在一起的值)
client系列
top/left/width/height
clientWidth & clientHeight: 获取当前元素可视区域的宽高(内容的宽高+左右/上下padding). 和内容是否溢出无关(和是否设置了OVERFLOW:HIDDEN也无关), 就是设置的宽高+padding
css中, 默认的height指内容的宽高, 不含padding+border; 设置了box-sizing: border-box, 代表了整个盒子的宽高, 内容+ padding+border.
clientTop & clientLeft: 获取(上/左)边框的宽度
获取当前页面一屏幕(可视区域)的宽度和高度
document.documentElement.clientWidth || document.body.clientWidth
document.documentElement.clientHeight || document.body.clientHeight
offset系列
top/left/width/height/parent
offsetWidth & offsetHeight: 在client的基础上加上border(和内容是否溢出也没有关系).
offsetTop / offsetLeft : 获取当前盒子距离其父参照物的偏移量(上偏移/左偏移)
offsetParent: 获取当前盒子的参照物.
在没有脱离文档流时: offsetLeft = 父级元素margin + 父级元素padding + 父级元素border + 自己的margin
脱离文档流时: offsetLefts = 自己的left + 自己的margin
scroll系列
scrollWidth & scrollHeight:真实内容的宽高(不一定是自己设定的值,因为可能会存在内容溢出,有内容溢出的情况下,需要把溢出的内容也算上)+ 左/上PADDING,而且是一个约等于的值 (没有内容溢出和CLIENT一样)在不同浏览器中,或者是否设置了OVERFLOW:HIDDEN都会对最后的结果产生影响,所以这个值仅仅做参考,属于约等于的值
element.scrollTop //向上卷出去的距离
element.scrollLeft //向左卷出去的距离
最小卷去值: 0
最大卷去值: 真实的页面高度 - 一屏幕的高度 document.documentElement.scrollHeight - document.documentElement.clientHeight
获取当前页面的真实宽高(包含溢出的部分)
document.documentElement.scrollWidth || document.body.scrollWidth
document.documentElement.scrollHeight || document.body.scrollHeight
滚动事件: element.onscroll = function(){}
封装浏览器的滚动事件
1 | function getScroll(){ |
获取元素具体的某个样式值
[元素].style.xxx操作获取, 但是这种方法只能获取行内上的样式
获取当前元素经过浏览器计算过的样式.(无论样式写在哪)
window.getComputedStyle([元素], [伪类, 一般都写null]) , 使用与IE9+
[元素].currentStyle, 获取经过计算的样式
常用方法的封装
匀速与变速函数的封装
今日心情
已被气死 不知道为啥就乱序了 格式就乱了。改呀改 改呀改 就气死了。凑凑合合看吧
## 帮助文档